top of page
/Ivybeth's Axe
Ivybeth does not wield this Axe. It is indeed an original design. I took variations of designs I saw online and photo-shop some cool concepts together. I added in some of my own elements and designs on top of that as well to create this!
NOTE: Videos will not play in mobile version. You can
Walkthrough of how I created Ivybeth's Axe!


After creating the design in photo-shop I printed out a life-size version to use as a template. I hope to keep making more of my own designs and start creating blue-prints.
This is the first time I have done something like this. Typically I just use pencil, paper, and a ruler. Guess I am a bit old school. .😂

The main material I used for the Axe is EVA foam. Which I am probably going to start using a lot more often. It's nice because it's affordable.
I am probably not going to be using worbla much because it is a little expensive for me.
After cutting out my pattern piece of the axe head. I traced it on about 6 pieces of foam and cut them out. Then I layered them using cement glue.

I picked out a PVC pipe from the hardware store. This was the main pole. So that the axe was stable I was going to need to run it through the whole body of the axe.
So I cut all layers in half with space for the pole aside from the top and bottom pieces.

I also needed to add in another PVC pipe crossing in the center. This will prevent the blade from wobbling back and forth. Had to cut a hole in the pole.. to add in the intersecting pipe. Creating a cross. Which was fun to carry around the hardware store. 😂

Before glueing the pieces together I score them. Score meaning to create a texture for a better bond. Often used in ceramics. I just took a blade and creating a hash marking along everything and then heated it up with the heat gun.
This specific foam when heated pulls the cuts apart to create a nice spacing for the glue. You can also do this just my using a hot knife or wood burning tool.


I wanted the Axe to be able to break down in 4 pieces. For easier travel and to prevents certain pieces from breaking.
I cut the PVC pipe in the top and bottom. Now I just have an axe head. I later added in pluming pieces to screw the pieces together. Or I used a coupling piece to slide the piece on. E
Now that I have all the pieces glued together.. which I believe ended up being 6 layers of foam? I can start to bevel the edge. This took some careful time and many showers. Sanding EVA foam is messy and gets everywhere! I did clean-up using the sanding bit on my dremel.

I created an organic design on the Axe using a wood burning tool. This was a technique that I have never done before. When burning foams it is important to use a respirator mask because harmful fumes come off the foam as you burn it. I also recommend doing it in a ventilated area. When sanding you can use the same type of mask for a dusk mask and eye wear! I also did use eye wear when burning the foam because the smoke can get in your eyes. I practiced first using a variety of dremel and wood burning tool bits. Then i drew on a concept of my design. I just kind of did what can natural after that.

Here is a video of my practice piece before I drew my design on the real piece. It was scary to draw the design at first out of fear of ruining it!


Trying to get a nice clean edge. 😅

Adding in the organic detailing.

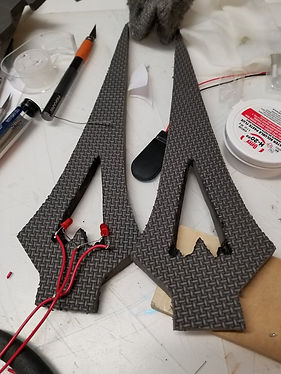
For the top pieces I cut out my pattern, traced it twice, cut out opposite sides, and added in LEDS. I needed to do all the wiring first and set in the LEDS before glueing the 2 pieces together. I left extra wire so when I was done I would have enough.


Close up of the details before painting. All this texturing was done with just the wood burning tool.
After glueing the halves together I beveled the edges on a belt sander. You could also use an orbital sander or dremel. However belt sander is easiest to get even long beveled edges. For the small part I used a sanding bit on the dremel. After that I added on some layers of spray paint filler. Did some sanding and then later I added on Plasti Dip.


I created the bottom pieces much like the top piece. If I have more time I would have created it out of wood or something harder than foam. Seeing at it's on the bottom I can not set it against the ground. Which makes holding it a bit more tiring. However I made this in about a week. 😅 I just made 2 halves for each pieces, glued them together, and then beveled the edges in short. For all the pieces glued together I use the hashmark technique and contact cement glue.


For the piece on the handle I first glued about 6 layers of foam together. Made sure all the sides were even by taking it to the belt sander. Lance actually did the rest for this part. He drew on a grid to help create the shape evenly. Taking it to the sander and sanding to the lines to create a more sphere look.

Really crunched for time of this one so the help was very much needed! After he made the shape I used a plasti Dip to coat it and painted it with acrylics.


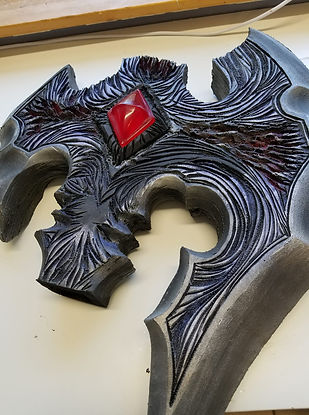
I think i painted this think about 4 or 5 times until I was happy with it. At first the whole thing was silver! I try a few different things... In the end it ended up being more purple / black. I thought it would match the costume more. I added in the dark reds and silver metals. Concept being the gem is creating the power of the Axe and morphing it. Cliche I know! 😂

This is the top moment of the creation of the Axe that was the most disappointing! Of course trying to finish in a hurry. So I had taped off the Axe which took about 2 hours or so. I use a nice metallic spray to get a crisp line. Tape peeling has a fun enjoyment to it unless..... the colors ends up being the same! The metallic I used on the Axe was a acrylic metallic. Which ended up being identical basically. Making this process a complete waste os time! lol Since I put the time into I figured I'd share it anyways.

Added in LEDs which as inset on both sides of the Axe. Also in the top piece as shown above.

The gem is attached to a foam piece which has velcro. This way it can be removed to turn the LEDs on and off as well as replace the batteries if needed.

Gems were originally sculpted from clay, baked, sanded, spray paint filler, sanded, and repeat.
Then I used Mold Star and resin. For this I dyed the resin and then buffed the gems.
This concludes the walkthrough for my Ivybeth axe! I used a lot of materials i do not normally work worth. To say the least I learned a lot in the 2 weeks I made it. It was a lot of non-stop work but I am pushing myself to be faster! Can't wait for new projects and more walkthroughs!
For finished photos please visit the IvyBeth Gallery.
bottom of page