Using Plastic to Create Armor
- Jan 12, 2023
- 3 min read

This was the second pass at the design for the shoe pieces. Originally I made the design follow more with the drawing. However I wanted to blend in my own design elements into the costume. I really like the look of the back scales. They look almost like dragon scales. Also the points and the design on her dress played a part into the alterations I made.
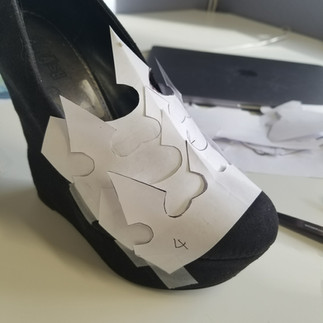
First I created my pattern. Coming from a background in animation / character study design is something I love to do.
I find that starting with paper is usually the best method. I generally make most my designs symmetrical. I fold the paper in half drawing one half of the design.


This isn't the shoe armor pattern (right image) but to get an idea of the next step I am going to use this image of the elbow armor.
I like to label all my pattern pieces. I write what they are, right or left, or any other details that may be helpful to remember.
The material I am using is polyurethane styrene (plastic) This is just a very specific type of plastic that I like to use. It's a great material because it is cheap but also durable.
The plastic I am using for these pieces if thinner so I am able to cut out the plastic. If you have a lot of pieces to cut out I would recommend wearing gloves.
My designs have a lot of tight curves that I am unable to get with scissors. To get into these tight places I use a sanding bit on my dremel.
After all the pieces are cut out I begin to form them with a heat gun and some gloves. This does take some time to get it to look clean. So it's a lot of re-heating and smoothing out.

Now that I have all my pieces formed. I set them up and make sure it looks right and will also be functional. Of course the sizes aren't very even. After I paint them and rivet them together it will be easier to do this kind of clean up work with the dremel.
Now that they are all formed I am just about ready to paint. First I clean up around all the edges with my dremel using the sanding bit.
Here is an example photo I have of the painting process. For these pieces I first used 3 coats primer filler > 4-5 Coats Black Gloss > 1 coat clear coat.
Normally I would do more than 1 clear coat. However I am not finished painting any of these pieces. I just wanted to use left over plastic I had which was white. I also had a bunch of black spray paint so I was just creating a nice base layer. Which is also super helpful because plastic materials can chip very easily. So I highly recommend using a prime and clear coat as a must.

The rivets I have are white but I later with over them with a black nail polish. Or you can sand them down until you see the shiny silver.
I love being able to rivet my armor together I think it makes it look more realistic.
It's a simple process of drilling the holes where you want the rivet. Using a rivet tool to clamp it together.
I have cleaned up the sides since this image. Here is mostly the final product. I am going to be doing some more painting on them like I mentioned before.


Comments